Spooky Baked Halloween Chips has become a must-have at all my October gatherings ever since I first experimented with ghost-shaped tortillas. I remember the year I hosted my first Halloween party, desperately searching for a snack that was both fun and easy. These Halloween themed baked chips were an instant hit! The smell of lightly toasted tortillas fills my kitchen, bringing back memories of laughter and costume parades. This easy spooky baked Halloween chips recipe lets you create delightful, crispy treats that disappear faster than ghosts on Halloween night. My friends still ask for them every year. Let’s get cooking!
Why You’ll Love These Spooky Baked Halloween Chips
I’m confident you’ll adore these chips for so many reasons:
- They’re incredibly quick to make, ready in under 15 minutes!
- The ghost shapes are a hit with everyone, making them perfect for festive spooky chips.
- These chips are a healthier alternative to fried snacks, making them healthy baked Halloween chips for kids.
- You only need three simple ingredients, keeping your budget happy.
- They’re naturally gluten-free if you use corn tortillas.
- This recipe offers a fun, interactive way to get kids involved in the kitchen, promoting healthy baked Halloween chips for kids.
- The crispy texture and light seasoning are absolutely addictive.
- They’re super versatile and pair well with almost any dip.
Ingredients for Spooky Baked Halloween Chips
Curious about what ingredients are in spooky baked chips? You’ll be delighted by how simple and accessible they are! I always keep these staples on hand, especially around Halloween, so I can whip up a batch of these festive spooky chips whenever the craving strikes.
- 3 pieces Tortillas – I prefer soft flour tortillas for a classic chip texture, but corn tortillas are a fantastic gluten-free option. They’re the canvas for our creepy baked potato chips!
- 2 tablespoons Oil – Avocado or olive oil works wonderfully here. I find a light brush of oil is key to getting that perfect crispiness without making them greasy.
- 1 teaspoon Salt – A sprinkle of fine sea salt enhances the flavor and makes these baked Halloween snacks truly addictive. Feel free to adjust to your taste!
These simple ingredients are all you need to create delicious and scary oven-baked crisps that everyone will love!
How to Make Spooky Baked Halloween Chips
Making these delightful Spooky Baked Halloween Chips is so much easier than you might think, and the results are incredibly rewarding! I love how quickly these come together, leaving me more time to enjoy the Halloween festivities. Follow these simple steps, and you’ll have a batch of crispy, ghostly treats in no time.
- Step 1: First things first, preheat your oven. I always set mine to 350°F (175°C) to ensure the chips bake evenly and get that perfect, satisfying crunch. This initial step is crucial for achieving crispiness.
- Step 2: Now for the fun part! Grab your tortillas and a ghost-shaped cookie cutter. Press the cutter firmly into the tortillas to create your spooky shapes. I usually get about 4-5 ghosts per tortilla, depending on the size of my cutter. You’ll quickly see your cute little ghosts coming to life!
- Step 3: Once you have your tortilla cutouts, it’s time to add flavor and help them crisp up. Lightly spray or brush each ghost with oil. I find a little goes a long way here; you don’t want them drowned. Then, sprinkle them evenly with salt. This is how to make Spooky Baked Halloween Chips truly shine!
- Step 4: Arrange your ghostly tortilla shapes in a single layer on a baking sheet. I like to use parchment paper to prevent sticking and make cleanup a breeze. Make sure they aren’t overlapping so they can bake uniformly.
- Step 5: Pop the baking sheet into your preheated oven. Bake for about 5-7 minutes. Keep a close eye on them, as oven temperatures can vary! You’re looking for them to become lightly golden and wonderfully crispy. The aroma filling your kitchen will be amazing.
- Step 6: Once baked to perfection, remove the baking sheet from the oven. Let the chips cool slightly on the baking sheet for a few minutes. This resting period enhances their crunch even further, transforming them into truly scary oven-baked crisps.
And just like that, you’ve learned how to make Spooky Baked Halloween Chips that are sure to be a hit at any Halloween gathering. It’s an easy spooky baked Halloween chips recipe that delivers big on fun and flavor!
Pro Tips for the Best Spooky Baked Halloween Chips
I’ve made these Spooky Baked Halloween Chips countless times, and I’ve picked up a few tricks along the way to ensure they turn out perfectly crispy and delicious every single time. These expert tips will elevate your festive spooky chips from good to absolutely ghoulishly great!
- Always use fresh, good-quality tortillas. Stale tortillas won’t crisp up as nicely.
- Ensure an even, light coating of oil. Too much oil makes them greasy, too little makes them dry.
- Don’t overcrowd the baking sheet. Give each ghost-shaped chip space to breathe and crisp up.
- Experiment with different seasonings beyond salt, like garlic powder or a pinch of chili powder for an extra kick.
- Let them cool completely on the baking sheet; this is crucial for maximum crunch.
What’s the secret to perfect crispy Spooky Baked Halloween Chips?
The real secret lies in the even, thin coating of oil and a perfectly preheated oven. I’ve found that brushing the oil on gives better control than spraying for that uniform crispness. As for how long to bake Halloween chips, closely watching them in the last few minutes is key to avoid burning and achieve that ideal golden-brown crunch.
Can I make Spooky Baked Halloween Chips ahead of time?
While these baked Halloween snacks are truly best enjoyed fresh, you can definitely do some prep work in advance! You can cut out your tortilla shapes up to a day ahead and store them in an airtight container. Then, just oil, salt, and bake right before your party for fresh, crispy results.
How do I avoid common mistakes with Spooky Baked Halloween Chips?
The most common pitfalls I see are overcrowding the pan and over-baking. Overcrowding leads to steaming instead of crisping, and over-baking turns them from golden to burnt in a flash. Watch them closely, especially on their first bake, and remember that cooling on the pan adds extra crispness.
Best Ways to Serve Spooky Baked Halloween Chips
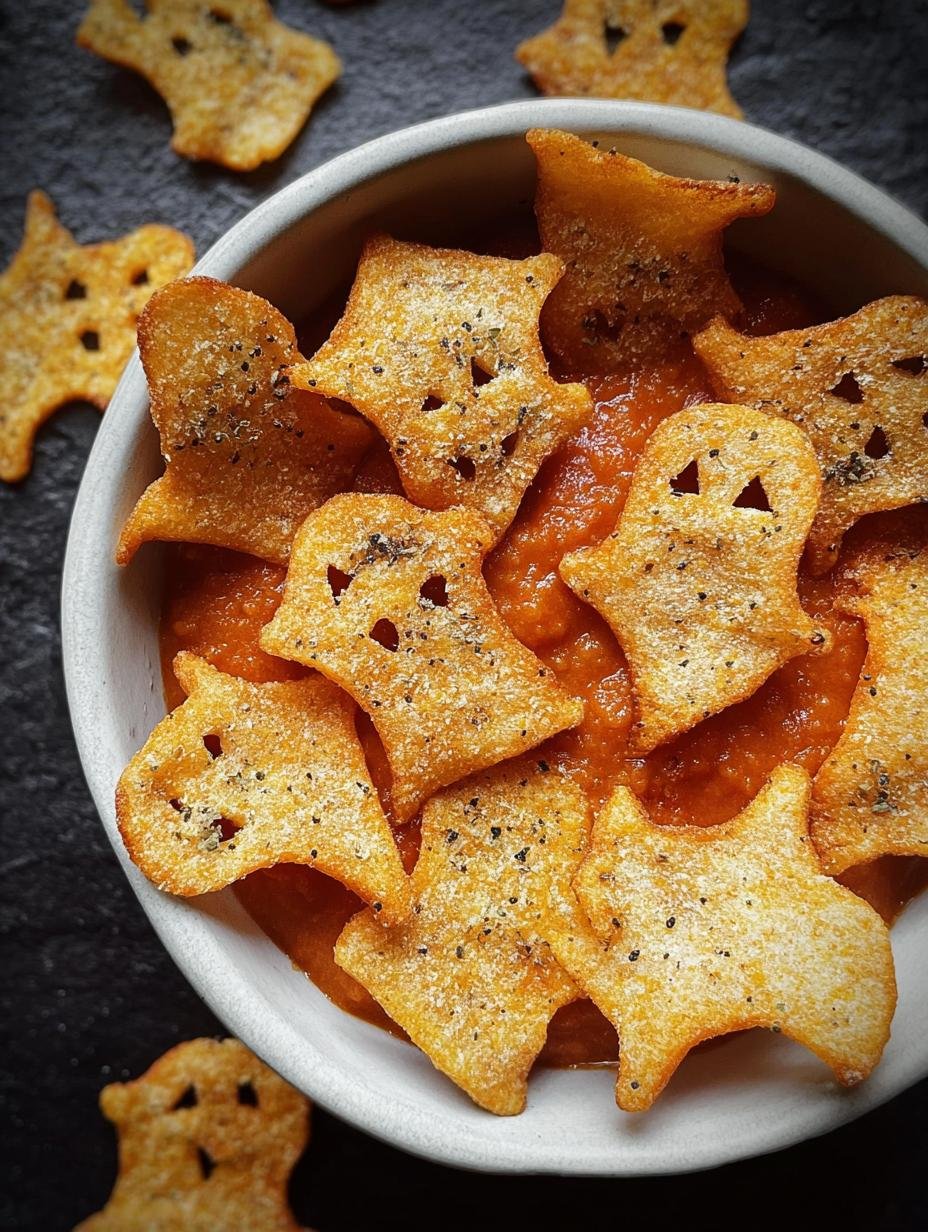
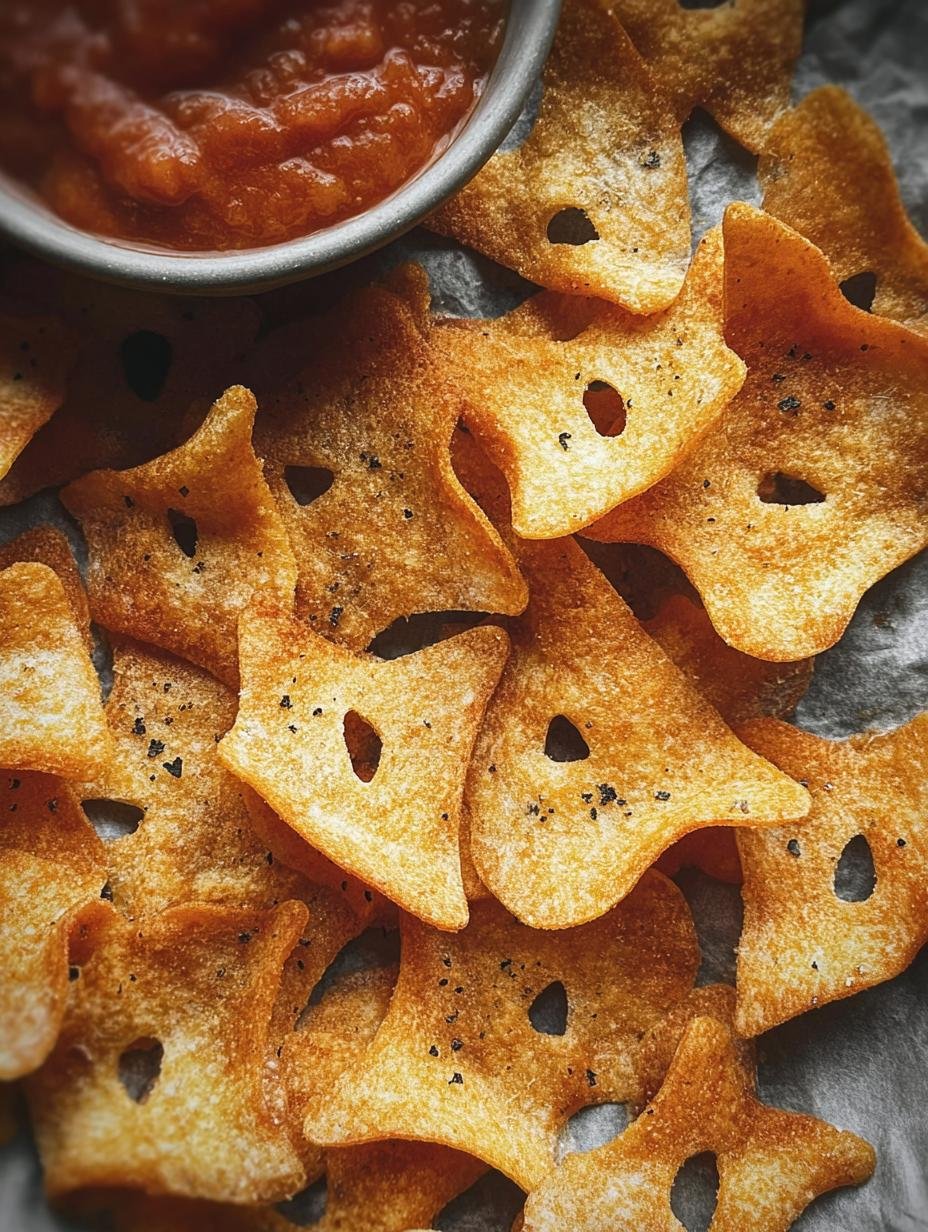
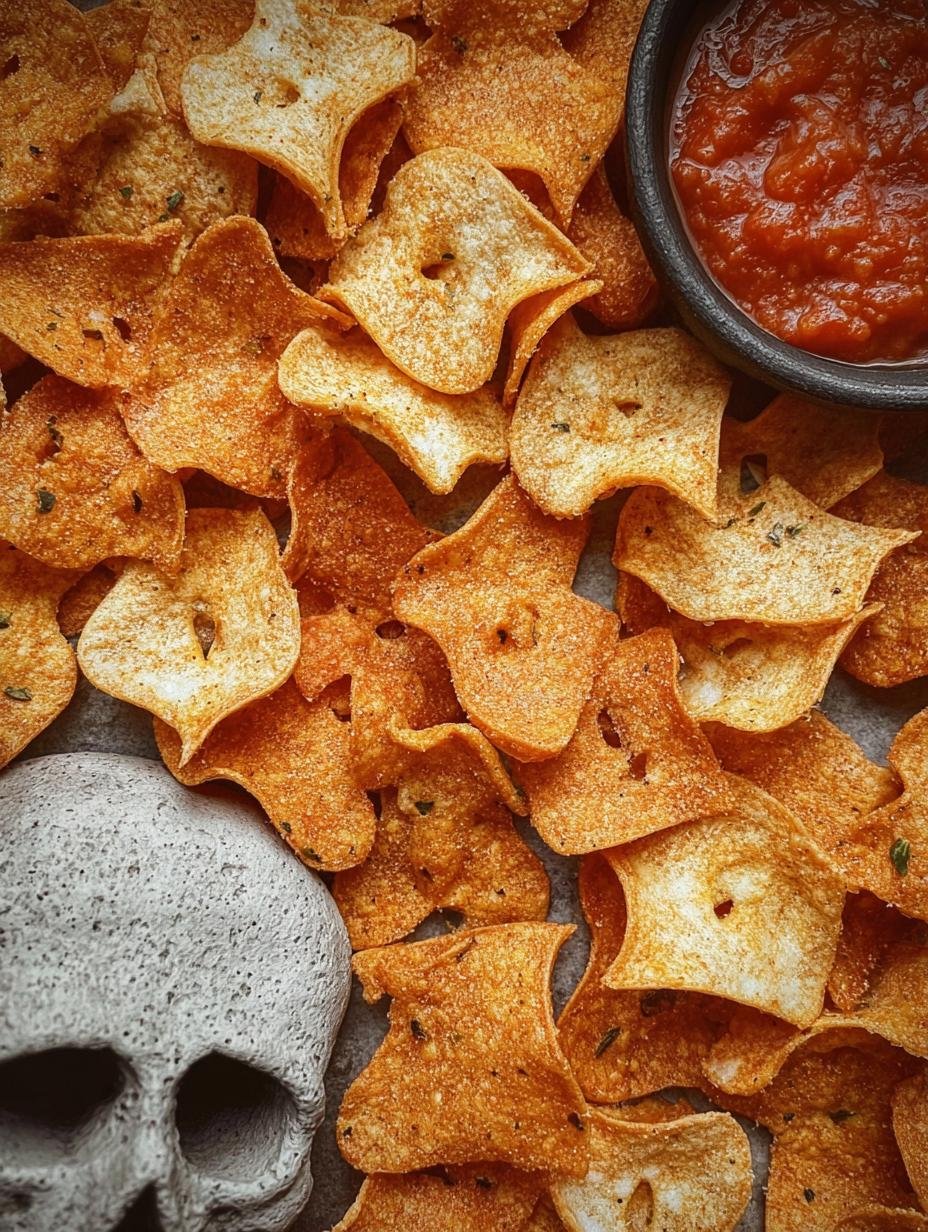
Once you’ve conjured up a batch of these delightful Spooky Baked Halloween Chips, it’s time to think about how to present them! I love making them the star of a festive snack spread. They’re incredibly versatile and pair wonderfully with a variety of spooky dips and sides, making them perfect for any Halloween party.
My go-to serving suggestion is always a vibrant dip. Think ghastly green guacamole, blood-red salsa, or even a creamy white onion dip. These baked Halloween chips with dip are an absolute crowd-pleaser, providing both visual appeal and delicious flavor. For a more substantial offering, I sometimes serve them alongside mini witch finger sandwiches or mummy hot dogs. The contrast in textures and flavors is fantastic. They also make a great crunchy topping for a spooky chili!
Nutrition Facts for Spooky Baked Halloween Chips
I know many of you are curious about the nutritional breakdown of these festive spooky chips, especially when planning for healthy Halloween treats. Here’s an estimate per serving, based on the ingredients for our delicious Spooky Baked Halloween Chips:
- Serving Size: 1 serving
- Calories: 120 kcal
- Protein: 2 g
- Fat: 6 g
- Saturated Fat: 1 g
- Unsaturated Fat: 5 g
- Trans Fat: 0 g
- Carbohydrates: 15 g
- Fiber: 1 g
- Sugar: 0 g
- Sodium: 200 mg
- Cholesterol: 0 mg
Nutritional values are estimates and may vary based on specific ingredients used, such as the type of tortilla or oil. These scary oven-baked crisps are a relatively light option!
How to Store and Reheat Spooky Baked Halloween Chips
You’ve whipped up a batch of these fantastic Spooky Baked Halloween Chips, and now you might be wondering how to keep them fresh or even enjoy them later. While these are truly best consumed fresh for maximum crispiness, I’ve got some tips for proper storage and reheating that will help you extend their delicious life.
First, always ensure your chips are completely cooled before storing them. Trapping warmth will lead to sogginess, and nobody wants that! Once cool, transfer your scary oven-baked crisps to an airtight container. They’ll stay fresh at room temperature for up to 2 days, though they might lose a little crunch. For longer storage, you can freeze them for up to 2 months. To reheat, simply spread them on a baking sheet and pop them back into a preheated oven at 350°F (175°C) for 5-7 minutes until they’re crispy again. This method works well for both refrigerated and frozen chips.
Frequently Asked Questions About Spooky Baked Halloween Chips
Can I use other cookie cutter shapes for these Spooky Baked Halloween Chips?
Absolutely! While the ghost shape is a classic for Halloween, I often use bat, pumpkin, or even cat cookie cutters to create a variety of festive spooky chips. Any Halloween-themed shape will work perfectly, adding to the fun and creativity of your baked Halloween snacks. It’s a great way to personalize your treats!
How do I make these Spooky Baked Halloween Chips extra flavorful?
Beyond salt, you can experiment with different seasonings! I sometimes add a pinch of garlic powder, onion powder, or even a tiny bit of smoked paprika for a subtle smoky flavor. For a sweeter twist, after baking, you could lightly dust them with cinnamon sugar. This is a fantastic way to customize your easy spooky baked Halloween chips recipe.
Are these Spooky Baked Halloween Chips suitable for a large party?
Yes, they are! This recipe is incredibly easy to scale up. I often make several batches when hosting a big Halloween gathering. The hands-on time is minimal, and you can bake multiple trays in succession. Knowing how to bake spooky Halloween chips efficiently means you can easily cater to a crowd, ensuring everyone gets to enjoy these crispy treats.
What kind of tortillas work best for these scary oven-baked crisps?
I find that soft flour tortillas give a slightly chewier, more pliable chip, while corn tortillas offer a crispier, more traditional chip texture, and are naturally gluten-free. Both work wonderfully for these spooky baked Halloween chips! My personal preference often depends on what I have in my pantry, but you can’t go wrong with either for creating delicious baked Halloween snacks.
Variations of Spooky Baked Halloween Chips You Can Try
Once you master the basic recipe for these Spooky Baked Halloween Chips, the fun doesn’t have to stop there! I love experimenting with different twists to keep things interesting. Here are a few homemade spooky Halloween chip ideas to inspire your next batch:
- Spiced Sweet Potato Chips: Instead of tortillas, thinly slice sweet potatoes (or even beets for a ghoulish red!) with a mandoline. Toss with oil and a sprinkle of cinnamon and nutmeg before baking. These offer a naturally sweet and healthy alternative.
- Cheesy Ghost Chips: After baking, sprinkle your ghost-shaped tortilla chips with a little finely grated Parmesan cheese and pop them back in the oven for 1-2 minutes until melted and bubbly. This adds a savory, cheesy dimension to your baked Halloween snacks.
- “Bloody” Pizza Chips: Brush tortilla cutouts with a thin layer of tomato paste, a dash of Italian seasoning, and a tiny bit of garlic powder before baking. Dip them in marinara sauce for a fun, bloody pizza chip experience.
- Spicy “Cauldron” Chips: For those who like a little heat, sprinkle your chips with a pinch of chili powder or smoked paprika along with the salt before baking. Serve these scary oven-baked crisps with a fiery salsa for an extra kick.

Delicious Spooky Baked Halloween Chips in 15 Mins
- Total Time: 22 minutes
- Yield: 4 servings 1x
- Diet: Gluten Free
Description
These Spooky Baked Halloween Chips are quick, gluten-free snacks. They are perfect for festive gatherings. Delight both kids and adults with these fun, ghost-shaped treats. They are ready in 15 minutes with just three ingredients.
Ingredients
- 3 pieces Tortillas (soft flour or corn tortillas for gluten-free option)
- 2 tablespoons Oil (e.g., avocado or olive oil)
- 1 teaspoon Salt
Instructions
- Preheat your oven to 350°F (175°C) to achieve perfect crispiness.
- Use a ghost-shaped cookie cutter to cut fun shapes from the tortillas.
- Lightly spray or brush the tortilla cutouts with oil and sprinkle with salt.
- Line a baking sheet with the ghostly tortilla shapes and bake for 5-7 minutes until crispy and lightly browned.
- Let the chips cool slightly on the baking sheet to enhance their crunch.
Notes
- Serve with ghostly dips like guacamole or salsa for an extra touch of Halloween fun.
- Store leftover chips in an airtight container at room temperature for up to 2 days.
- For best taste, consume these spooky baked chips fresh on the same day they are made.
- You can freeze these spooky baked Halloween chips for up to 2 months. Reheat in the oven at 350°F (175°C) for 5-7 minutes.
- Ensure a light, even coating of oil to keep spooky baked Halloween chips crispy.
- Watch the chips closely while baking to prevent burning.
- Use various cookie cutter shapes for creative spooky baked Halloween chips.
- Utilize leftover tortilla scraps to make bonus spooky baked Halloween chips.
- Pair these spooky baked Halloween chips with a variety of dips.
- Prep Time: 15 minutes
- Cook Time: 7 minutes
- Category: APPETIZERS
- Method: Baking
- Cuisine: American
Nutrition
- Serving Size: 1 serving
- Calories: 120 kcal
- Sugar: 0 g
- Sodium: 200 mg
- Fat: 6 g
- Saturated Fat: 1 g
- Unsaturated Fat: 5 g
- Trans Fat: 0 g
- Carbohydrates: 15 g
- Fiber: 1 g
- Protein: 2 g
- Cholesterol: 0 mg